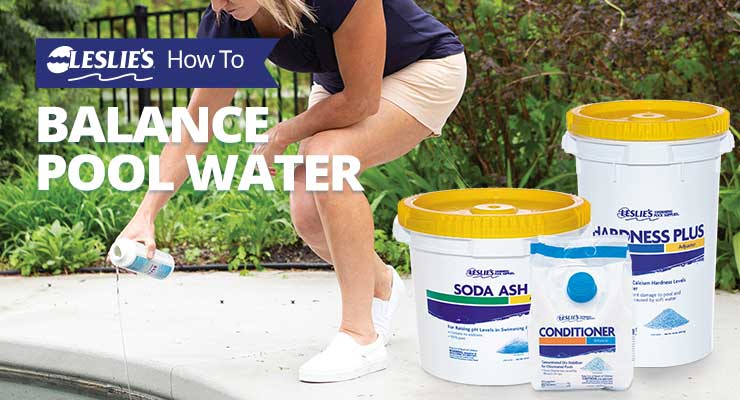
How to Balance Pool Water
Whether this is your first time balancing a pool or you’ve owned a pool for many years, a helpful reference guide on how to properly balance pool water can sometimes come in handy. This isn’t just a quick synopsis. This is an in-depth look at what it takes to maintain the health of your pool water. If you're looking for a quick-reference guide that consolidates the information below, head on over to our other blog post, Pool Chemistry 101.
First, we’ll walk you through the basics:
How to Prepare the Pool
How to Calculate Pool Volume
How to Test Pool Water

And Finally, How to Balance Pool Water
Next, we’ll do a deep dive into the different aspects of water chemistry. You'l learn about ideal testing ranges and which chemicals to use in different scenarios. We’ll also discuss how certain pieces of the water balance puzzle impact one another. With Leslie’s, you’ll look like a water balancing expert, because We Know Pools! Let’s get started!
1. Prepare the Pool for Testing and Balancing
Before you get started, make sure the pool water is ready for testing and balancing. Check that the water level is at least halfway up the mouth of the skimmer, and add more if needed. Remove debris from the skimmer and pump baskets.
Next, turn on the pool pump, and make sure that it’s running properly. If you have a variable speed pump, run the pump on high speed. You can't accurately measure water chemistry in stagnant water. Also, attempting to balance a pool that’s not circulating properly damage pool surfaces. Make sure the pool filter is clean before you proceed to the next step.
2. Calculate Pool Volume
In order to know how to properly dose your pool, you first need to know how many gallons of water the pool holds. If you don’t already know the volume of your pool, just do a bit of math to get a close estimate. First, find the cubic footage of your pool. Then multiply that number by 7.5 to find your pool volume in gallons.
BONUS TIP: An accurate depth measurement can make or break a volume calculation. Does your pool have the same depth throughout? Or is the bottom sloped with both a shallow end and a deep end? If your pool has a slope, you’ll need to find the average depth in order to accurately calculate pool volume. Please note that this equation only works for pools with a constant slope from the shallow end down to the deep end: (Shallow End Depth + Deep End Depth) ÷ 2 = Average Depth
Here are a few example formulas to get you started.
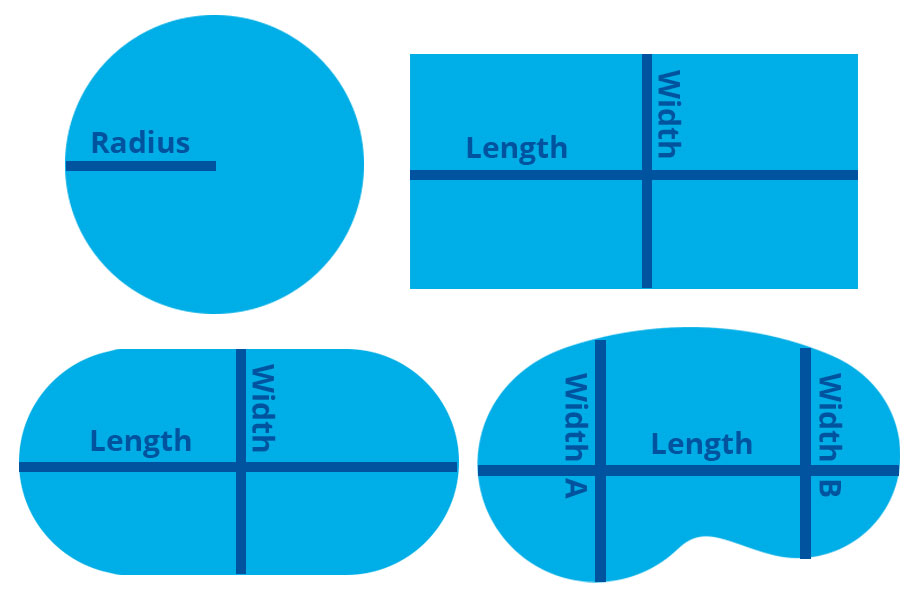
Rectangular or Square Pool
Length x Width x Depth x 7.5 = Pool Volume (Gallons)
Round or Circular Pool
3.14 × Radius2 × Depth x 7.5 = Pool Volume (Gallons)
Oval Pool
3.14 x Length x Width x 0.25 x Depth x 7.5 = Pool Volume (Gallons)
Kidney Shaped Pool
With a kidney shaped pool, measure the widest point in both portions of the kidney shape to get your A and B width measurements. Then plug those measurements into the equation below:
(Width A + Width B) x Length x 0.45 x Depth x 7.5 = Pool Volume (Gallons)
For more information on pool size or to view a quick reference chart, check out our blog post on calculating pool volume.
3. Test the Pool Water
Before you can balance pool water, you need to know the status of your pool’s chemistry. Test the water using an at-home pool water test at least two or three times each week. Then, once a month, bring a sample to your local Leslie’s store for an in-depth professional water analysis — it’s free! Most at-home tests only look at a few aspects of water chemistry, such as Chlorine, pH, Total Alkalinity, and Calcium Hardness. Taking advantage of the free AccuBlue® water test at Leslie’s allows you to look at all aspects of water chemistry without having to purchase a bunch of extra test kits. AccuBlue also provides unparalleled testing accuracy to ensure your water balance stays on track.
For the most accurate test results, collect your water sample after the pool pump has been running for at least an hour at high speed. Lower your sample tube into the water about elbow deep, or around 12–18 inches below the surface. Avoid taking a sample near any return fittings or floating chemical dispensers.
Once you have your test results, keep track of them. Write them down in a pool journal or plug them into the Leslie’s App to monitor trends over time.
Need help with testing your pool water? Watch this video, or check out our blog post, Pool Water Testing 101.
4. Balance Your Pool Water
When adjusting the chemistry in your swimming pool, it’s important to add your chemicals in a certain order. Some aspects of water chemistry impact the balance or efficiency of others. Also, some chemicals need time to circulate before you can add other chemicals to the water. Otherwise, you may end up with an inadvertent chemical reaction that’s dangerous for you and/or damaging to your pool. By sticking to a routine water balancing format, you’ll keep your water clean, clear, sanitary, and safe.
With the pool pump running on high and test results in hand, it’s time to start balancing the pool. Always follow product label instructions to ensure safe handling and avoid overdosing the pool. With some chemicals, it’s recommended to wear personal protective equipment, such as safety goggles and gloves. The label often lists the amount of chemical required to achieve a desired effect. This measurement is usually based on 10,000 gallons of pool water. However, it can vary widely depending on the type of product you’re using.
BONUS TIP: When balancing a pool, always add chemicals to water. NEVER pour water over chemicals in an attempt to dilute them. Doing so increases the risk of bodily harm from a chemical reaction. If dissolving or diluting chemicals, start with a large five-gallon bucket with water in it (refer to product label instructions for the recommended amount of water). Add the chemicals to the water, and stir with a plastic utensil or stirring stick.
It’s important to remember that you won’t have to balance all aspects every time you test your pool. You may only need to address one or two, or sometimes even none at all. So how do you properly balance the different aspects of your pool’s water chemistry? Let’s dive in!
Follow the ordered sequence below when adding any chemicals to your pool. Always read and carefully follow product label instructions. With the pool pump running on high speed, add products directly to pool water, unless the label specifies otherwise. Never mix chemicals — allow at least four hours after application before adding other chemicals, or longer if the product label indicates more time is needed. The label should also indicate the waiting time until the water is safe for swimming.
Metals (Copper/Iron): 0 ppm ideal
Metals in pool water can cause staining issues, especially if other aspects of water chemistry are out of balance. Copper and iron levels higher than 0.2 ppm need to be addressed immediately to prevent unsightly pool stains and water discoloration. Use a chelating or sequestering agent, such as Leslie’s NoMetal, Natural Chemistry METALfree, or CuLator, to manage metals in the pool.
BONUS TIP: Sequestering and chelating agents don’t just protect against metal stains. They can also help prevent unsightly calcium scale. Risk factors include high Calcium Hardness, the presence of metals in the water, and/or high pH. Before you start balancing your pool water, consider if your pool is at risk, and add stain and scale prevention chemicals if necessary. Even under the best circumstances, calcium and metals can still come out of solution if not properly managed. An ounce of prevention goes a long way in protecting the appearance of your pool!
Total Alkalinity: 80–120 ppm ideal (60–180 ppm acceptable)
Total Alkalinity (TA) is a measure of alkaline materials in the water. It helps control pH to keep it more stable. The chemicals used to balance TA also impact pH balance, so it’s usually best to balance one and then the other — not both at the same time. If using calcium hypochlorite (cal-hypo), sodium hypochlorite, or lithium hypochlorite as your primary sanitizer, the ideal TA range is 80–100 ppm. When using dichlor, trichlor, or bromine as your primary sanitizer, the ideal range is between 100–120 ppm. For a saltwater chlorine generator, most manufacturers recommend TA levels between 80–120 ppm.
If TA is low, add sodium bicarbonate (Leslie’s Alkalinity Up) or sodium carbonate (Leslie’s Soda Ash), based upon the pH level. If TA and pH are both low (TA less than 80 ppm, pH below 6.8), test for the presence of metals before using Soda Ash to bring the levels up. Otherwise, use Alkalinity Up.
If TA is too high, add sodium bisulfate (Leslie’s Dry Acid) or muriatic acid to bring the levels down. For fiberglass, vinyl liner, or painted pools, we recommend using Dry Acid.
Again, always refer to label instructions and follow recommended safety protocols when handling any pool chemicals. Once TA is properly balanced, you’ll be able to focus on adjusting the pH.
pH: 7.4–7.6 ideal (7.2–7.8 acceptable)
With Total Alkalinity in the desired balance range, it’s time to adjust your pH. A low pH means the water is acidic, which can be corrosive to pool equipment and pool surfaces. It may also cause skin and eye irritation. Low pH will also cause Free Available Chlorine to dissipate faster than normal.
On the other hand, a high pH reading is the result of basic or alkaline water. This greatly reduces the efficacy of chlorine, causes cloudy water, and can leave unsightly scaling and staining on pool surfaces and equipment. Vinyl liners and solar covers react poorly to unbalanced pH, and the resulting damage is not covered under warranty.
As you can see, lots of things can go wrong when the pH is out of whack. To avoid problems, it’s important to try and keep it within the ideal range of 7.4–7.6.
To move the pH up or down, use the correct pH balancer. Sodium bisulfate (Leslie’s Dry Acid) or muriatic acid will lower the pH, and sodium carbonate (Leslie’s Soda Ash) will raise pH levels. For fiberglass, vinyl liner, or painted pools, we recommend using Dry Acid to lower the pH level.
BONUS TIP: After adding chemicals to the pool, how long should you wait before swimming? It really depends on the chemical. This is why it’s so important to read the product label and follow all instructions. For changes to pH, Total Alkalinity, Calcium Hardness, and Cyanuric Acid levels, we typically recommend letting the pool circulate on the high setting for at least four hours.
Calcium Hardness: 200–400 ppm ideal (150–800 ppm acceptable)
Believe it or not, Calcium Hardness plays a big role in the health of your pool. Water that doesn’t have enough calcium is referred to as soft water. That might not sound like a bad thing, at first. However, soft water tries to balance itself by drawing calcium from surrounding surfaces. This results in erosion, etching, and pitting of tile grout, plaster, pebble, and concrete surfaces in your pool. On the other hand, high Calcium Hardness, also known as hard water, can cause cloudy pool conditions. High Calcium Hardness also causes scale buildup on pool surfaces and the inside of your plumbing and pool equipment.

When it comes to balancing Calcium Hardness, it’s much easier to raise it than to lower it, so do this in increments. Adding calcium chloride (Leslie’s Hardness Plus) will bring the levels up. But if Calcium Hardness gets too high (above 600 ppm), you may want to partially drain the pool and refill with fresh water with a lower Calcium Hardness level. Always consult a pool professional before you consider draining your pool. Certain risk factors (pool type, air temperature, water table, etc.) can cause irreversible damage to the pool if not done properly. When in doubt, drain a foot of water, then add a foot of water. Keep repeating this process until desired levels are reached.
When struggling with hard water, it’s important to use a scale prevention product to keep unsightly scale from building up on pool surfaces. Keep in mind that having a high pH, even with ideal Calcium Hardness levels, can also lead to scale buildup. Maintain proper water balance to avoid these types of issues.
BONUS TIP: Do not add Leslie’s Hardness Plus on the same day you add either Leslie’s Soda Ash or Leslie’s Alkalinity Up. Doing so can cause cloudy pool water, increased scaling on pool surfaces, and the development of small solids in the water.
Chlorine: 1.0–4.0 ppm
Chlorine levels in the pool are determined by two different measurements: Free Available Chlorine (FAC) and Total Available Chlorine (TAC). FAC is the amount of chlorine in the pool that’s readily available to control germs and algae, keeping the water disinfected and sanitary. TAC looks at the total amount of all chlorine in the water, including FAC. If the TAC level is different than the FAC reading, that means your pool has inactive Combined Chlorine, also known as chloramines. Chloramines can cause skin, eye, and mucous membrane irritation, and are responsible for that unpleasant strong chlorine smell.

When the FAC level is at least 0.3 ppm or more below your TAC reading, it’s time to shock the pool. Shocking or oxidizing the water with a high quality pool shock is the practical way to remove inactive Combined Chlorine and ensure a proper Free Available Chlorine level.
If FAC levels are higher than 2.0 ppm, use a non-chlorine pool shock like Leslie’s Fresh ‘N Clear to oxidize the water. If FAC is lower than 2.0 ppm, we recommend using cal-hypo pool shock (Leslie’s Power Powder Plus 73) or liquid chlorine to bring the levels up. Please note that cal-hypo contains calcium, which will increase Calcium Hardness levels in the pool. Do not use this type of pool shock if your Calcium Hardness levels are already high.
Before shocking the pool, be sure you have properly balanced the Total Alkalinity, pH, and Calcium Hardness levels, and have addressed metals in the pool. This will maximize the sanitation power of the chlorine, and will also prevent stains caused by the precipitation and oxidation of metals. Most pools should be shocked at least once a week. However, there are certain scenarios when you might want to shock more often. Aside from that, make sure you’re adding enough chlorine to your pool to keep up with daily demand. Using a floating chemical dispenser or in-line chlorinator with 3” tablets ensures a consistent flow of chlorine into the water, as does using a saltwater chlorine generator.
BONUS TIP: Shocking the pool can skew water test results until the FAC level drops. If you want to double-check the status of your water balance, either retest the pool before adding shock, or wait at least 24 hours after shocking the water, when the FAC level returns to 2.0–4.0 ppm. Swimmers should not use the pool until FAC falls within this range.
Add water clarifier
Once the pool has been balanced and sanitized, assess the condition of the water. If your pool looks anything less than clear and sparkling, consider using a clarifier to brighten things up a bit. Clarifiers, such as Leslie’s Ultra Bright Advanced, work by coagulating microscopic particles into larger groups. This makes it easier for your pool filter to remove them from the water. Regular applications of clarifiers help boost both filtration and sanitizer efficiency. Some clarifiers, such as Leslie’s Clear Aid, also use enzymes to break down organic contaminants in the water.
Add algaecide
Whether your pool is taking on a green hue or you’re just keeping up with routine preventative measures, now’s the time to add your algae control chemicals. The water is balanced, sanitizer levels are where they should be, and your chosen algaecide can work most efficiently. If your pool is suffering an algae bloom, it’s important to determine the type of algae before treating it.
To learn more about the ins and outs of using algaecide, watch the video below, or head over to our blog post, How To Prevent and Remove Algae.
Cyanuric Acid: 30–100 ppm ideal (10 ppm minimum)
Cyanuric Acid (CYA) plays a critical role in conserving your outdoor pool’s chlorine. It acts as a stabilizer, protecting chlorine from being destroyed by the sun’s harsh UV rays. If there’s not enough CYA in the pool, then soon there may not be enough chlorine in your water, either! On the other hand, CYA levels that are too high will cause chlorine to be less effective at sanitizing the water.

Every chlorine pool needs to start with at least the minimum level of acceptable CYA, which is 10 ppm. Stabilized chlorine (trichlor tablets or granular dichlor) will add a small amount of CYA to the pool with each application. You should only need to add more CYA if there’s a pool leak or if the pool has been drained. On the other hand, if you're using unstabilized chlorine (liquid chlorine, cal-hypo, or a saltwater chlorine generator) as your primary sanitizer, additional CYA (granular Leslie’s Conditioner or liquid Instant Conditioner) will need to be added separately to maintain ideal CYA levels. Please note that dry conditioner dissolves slowly, so start with a clean pool filter, and don't backwash or clean the filter for at least three to five days after application.
BONUS TIP: CYA is a buffering compound, so high levels should be taken into account when looking at Total Alkalinity (TA). If your CYA level is 60 ppm or higher, you can find your adjusted TA levels by using this formula: Tested TA - (CYA ÷ 3) = Adjusted TA
Just like with Calcium Hardness, it’s easier to increase the CYA level than to lower it. So when adding CYA increaser, do so with caution. If CYA levels are excessively high (100–125 ppm or greater), consult with a local Leslie’s professional about partially draining and refilling the pool to dilute the CYA concentration. Never drain more than a foot at a time, and always refill with fresh water.
Phosphates: 0 ppm ideal
No one likes a pool full of algae. In addition to maintaining proper sanitizer levels to control the algae, it’s important to also make sure there’s no food for the algae to eat. Phosphates are algae’s primary food source, so you want phosphate levels to be as close to 0 ppm as possible. If they’re not, just add a phosphate remover. If levels are higher than 100 parts per billion (ppb), use Leslie’s NoPHOS. Once phosphates fall below this level, we recommend using Leslie’s Perfect Weekly as part of your regular pool maintenance routine.
Total Dissolved Solids: 0–2500 ppm ideal for non-saltwater pools
Total Dissolved Solids (TDS) are exactly what they sound like — this is a measurement of all the solids dissolved in your pool. This includes minerals, salts, and metals, as well as other inorganic and organic materials suspended in the water. If this measurement is within range, you’re good to go! The only time you need to worry about adjusting pool water balance here is if your TDS reading is higher than 2500 ppm. At this point, it’s best to consult with a Leslie’s pool professional about partially draining and refilling the pool. The best way to replace the water is to drain a foot of water, then add a foot of water, repeating this process until you reach desired TDS levels. As TDS levels get higher, it can get progressively harder to balance the water.
Keep in mind that saltwater pools will have a higher TDS level because of the higher salt content. The rule of thumb is that TDS levels should not be higher than 1500 ppm above the salt level reading.
BONUS TIP: If you have to drain water from the pool, the chemistry will change once you add fresh water back in. Once you have reached the desired levels of Calcium Hardness, Cyanuric Acid, Total Dissolved Solids, and/or salt, you'll need to reassess the other aspects of water chemistry to ensure they're within the ideal range. Let the pool recirculate for at least an hour at high speed, and collect a new water sample for testing.
Salt
If you have a saltwater pool, you’ll also need to keep track of the salt concentration in the water. The ideal level varies slightly depending on the manufacturer of your saltwater chlorine generator. Some brands or models have ideal salinity levels as low as 2,500 ppm, while others require upwards of 5,000 ppm.
Check the manufacturer’s recommendations, and if levels are low, add more pool salt. How much salt, you ask? It depends on how many parts per million (ppm) you need to increase, which can be found by subtracting your current salt level from the desired salt level. Use this formula to get a close estimate:
0.0833 x (Pool Gallons ÷ 10,000) x PPM Increase = Pounds of Salt Needed
If the result is less than 1.0, multiply your answer by 16, which will convert the amount into ounces.
BONUS TIP: Electronic salt meters often are not accurate if the water temperature is 60ºF or below. At this temperature, your saltwater chlorine generator won’t be working efficiently, either. Don’t add more salt to the pool until temperatures increase above 60ºF.
Conclusion
As you become familiar with the water balancing process, it will become easier with each passing week. But if you run into any issues, our knowledgeable Leslie’s associates are here to help you become a water balancing expert. At Leslie’s, We Know Pools, and it’s our goal to make sure you do, too! Bring your questions and a water sample to your local Leslie’s, and we’ll be happy to walk you through every step of the way.