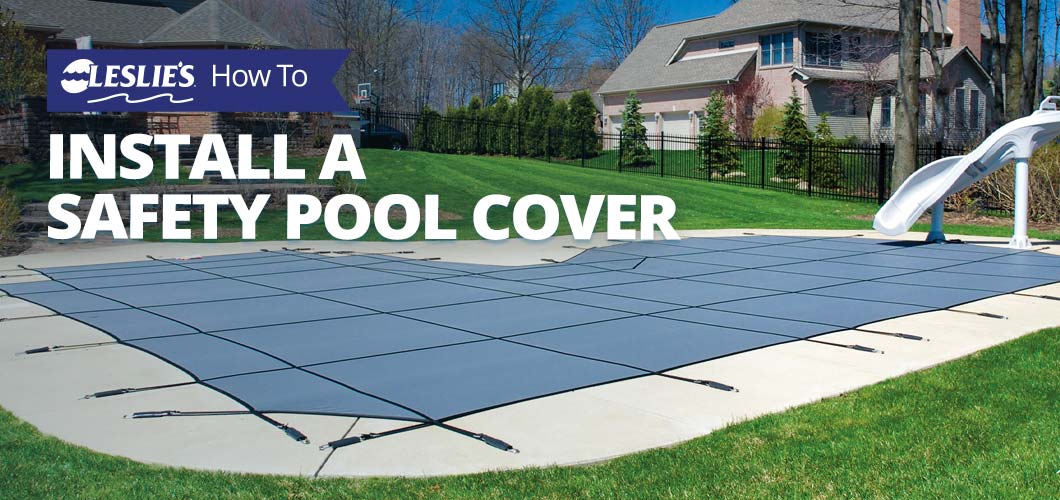
How to Install a Safety Pool Cover
Swimming pools are a great addition to any home and provide hours of entertainment and relaxation for family and friends. However, it's important to prioritize safety when it comes to pool ownership. One way to do this is by installing a safety pool cover. A safety cover not only protects against accidental falls and drownings, but also keeps debris out of the water and helps retain heat during cooler months. But how exactly do you install a safety pool cover? In this article, we'll cover everything you need to know to install your own safety cover on a pool. From measuring your pool to selecting the right cover, we'll walk you through the steps to ensure a successful installation. Let's dive in!
Why Safety Pool Covers Are Important
A safety pool cover is a crucial investment for any pool owner. It provides a physical barrier between the pool and the surrounding area, preventing children and pets from accidentally falling in. According to the Centers for Disease Control and Prevention (CDC), drowning is the leading cause of unintentional deaths in children ages 1-4, and the second leading cause of unintentional deaths in children ages 5-14. By installing a pool safety cover, you can significantly reduce this risk.
In addition to safety, a safety cover also helps keep your pool clean. It prevents leaves, debris, and other outdoor elements from entering the water, which can save you time and money in maintenance costs. Additionally, a safety cover can help you protect your pool during the cold off-season months after you've winterized the pool.
Types of Safety Pool Covers
Below we highlight the three main types of pool safety covers, and discuss each one's pros and cons. For more information about each cover, read our comprehensive Safety Cover Buyer's Guide article.
Mesh Safety Covers
Mesh safety covers are made of a durable, breathable mesh material that allows rainwater to pass through into your pool, while keeping debris out. They are typically less expensive than solid covers, and are easier to install and remove. However, the mesh material does not provide as much protection against sunlight or evaporation, and may require more maintenance.
Solid Safety Covers
Made of a solid material, solid safety covers completely block out sunlight and prevent water evaporation. They are generally more expensive than mesh covers, and can be more difficult to install and remove due to their weight. However, they provide better protection against debris and sunlight, which keeps your pool cleaner and helps chemicals last longer.
Automatic Safety Covers
As the name suggests, automatic covers are motorized covers that can be opened and closed with the push of a button. They provide the most convenience and ease of use, and can be customized to fit any pool shape or size. But their convenience comes with a higher price tag and an increase in routine maintenance.
Required Tools and Supplies for Installation
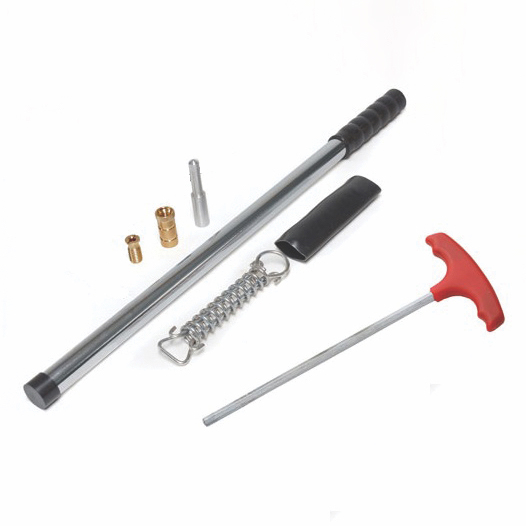
Before installing your new safety cover, remove any obstructions in your pool, like ladders, diving boards, or floating chlorinators. Once all items are out of the way, gather the following tools and supplies so you can start installing the cover:
- 3/4" Concrete drill bit
- 7/8" Drill bit for interlocking brick
- Heavy-duty hammer drill
- Metal tape measure
- Piece of chalk
- Hammer
- 1/4" Allen Key
- Safety goggles
Always read the manufacturer's instructions carefully to ensure that you have all the necessary tools and equipment.
Installing a Safety Pool Cover
Now that you have all the tools and equipment needed for installation, it's time to get started installing your safety cover! Follow the steps below, or watch this video to learn how to install your new safety pool cover:
1. Clean the pool deck
Before installing the cover, clean the pool deck and remove any equipment, furniture, or debris that might get in your way during installation.
2. Lay safety cover over the pool
Unroll the safety cover and lay it out across your pool with the protective rub strips facing down. Adjust the position of the cover as needed, ensuring equal overlap around the pool. This is the time to double and triple check the position of your cover before you move on to step 2 and 3. Place buckets of water around the cover to temporarily secure it to the pool deck.
3. Mark the deck for drilling
When you have your safety cover in the right position, use a piece of chalk to mark where you will drill each anchor hole. The chalk will be your guide as you start drilling into the pool deck. Once you've mapped out where each anchor will go, you can start drilling.
4. Install the anchors
First, select the longest strap, running end to end down the middle of the cover. Following the line of the strap, measure 4 inches back from the end of the strap and drill a hole in the pool deck 1⅝ inches deep. Clean the dust out of the hole, then insert the anchor and gently tap it down with a hammer. Finally, screw the brass insert into the anchor, leaving about ⅜ inches above the deck surface.
Repeat this process for the rest of the anchors.
5. Attach springs to the cover straps
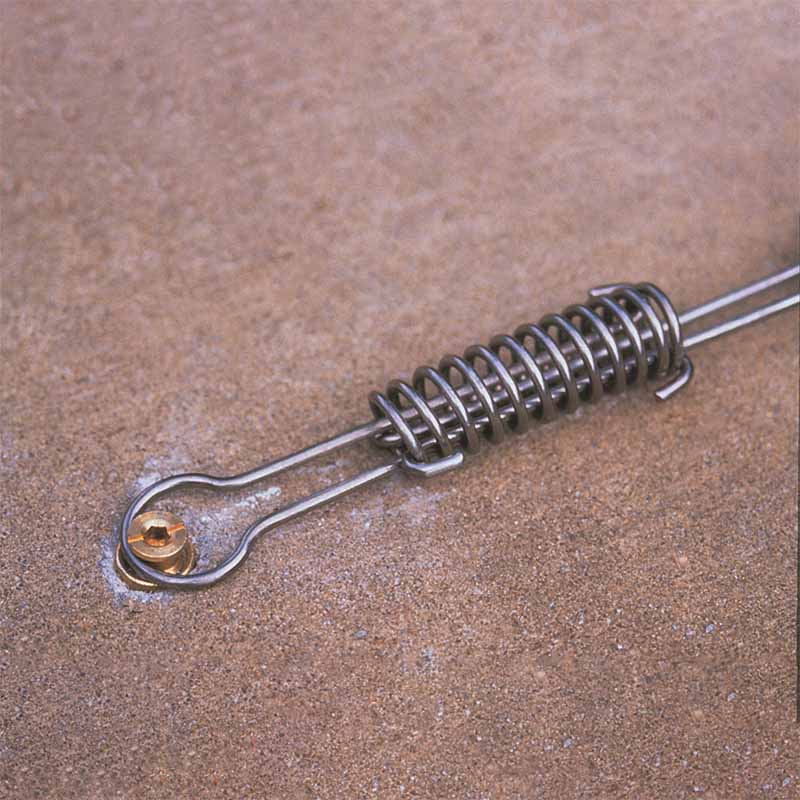
When installing the strap springs, ensure the edges of the adjustment buckles face downward. Starting with one end of the middle strap running the length of the cover, feed the strap up through the first slot of the adjustment buckle, then back down through the center slot. Next, loop the strap through the square end of the spring, and then back up through the center slot. Finish by feeding the end of the strap through the last opening in the buckle, and attach the spring to the anchor. Repeat this step on the opposite end of the middle strap. Once both ends of the middle strap are secured, move on to the two straps on either side of the middle strap.
Then, repeat the process on the longest strap across the width of the cover, followed by the two straps on either side. When these straps are secured, you can continue with attaching the rest of the straps.
5. Test the cover
Once the cover is installed, test it to ensure that it is functioning properly. This may involve filling the pool with water to test the tension of the cover, or simply observing how the cover fits and stays in place.
Testing Your Safety Pool Cover
After installation, it's important to test your pool safety cover regularly to ensure that it is functioning properly. Here are some tips for testing your cover:
Check the tension
Make sure that the cover is tight and secure, with no sagging or loose areas.
Inspect the anchors
Check the anchors periodically to ensure that they are still securely fastened to the pool deck.
Remove debris
Remove any debris or leaves that may have accumulated on the cover, as this can cause damage or prevent proper functioning.
Test the weight capacity
If you have small children or pets, it's important to test the weight capacity of the cover to ensure that it can support their weight in case of an accidental fall.
BONUS TIP: Testing the weight capacity of your safety pool cover should only be done after installation. Repeatedly placing heavy loads on the cover can wear out the straps and springs, and loosen the anchors. Once you determine the weight capacity is adequate, don't let anyone walk or stand on the cover.
Maintaining Your Safety Pool Cover
To ensure the longevity and effectiveness of your pool safety cover, it's important to maintain it properly. Clean your cover regularly to remove any debris or dirt that may have accumulated. Use a soft brush or hose to gently scrub the cover, and avoid harsh chemicals or abrasive materials. And when your cover is not in use, store it in a cool, dry place to prevent sun damage.
Installing a pool safety cover is a simple and effective way to protect your loved ones and keep your pool in top condition. By following these step-by-step instructions and tips, you can ensure a successful installation and proper maintenance of your cover! If you have any other questions, stop by your local Leslie's and speak with one of our pool care experts about all things pool covers.
JUMP IN WITH US ON SOCIAL!