How to Troubleshoot a Hayward AquaRite Salt System
Hayward is known for producing top-of-the-line pool equipment, and the Hayward AquaRite salt system is no exception. The number one selling salt system in the world (really!), Hayward AquaRite efficiently sanitizes your pool water by transforming sodium chloride — salt — into free chlorine. Once bacteria and algae have been eliminated, the chlorine reverts back into salt. The intuitive and user-friendly AquaRite controller allows you to easily manage the output of chlorine. Below is a step-by-step guide detailing how to recalibrate and troubleshoot your AquaRite salt system, should problems arise.
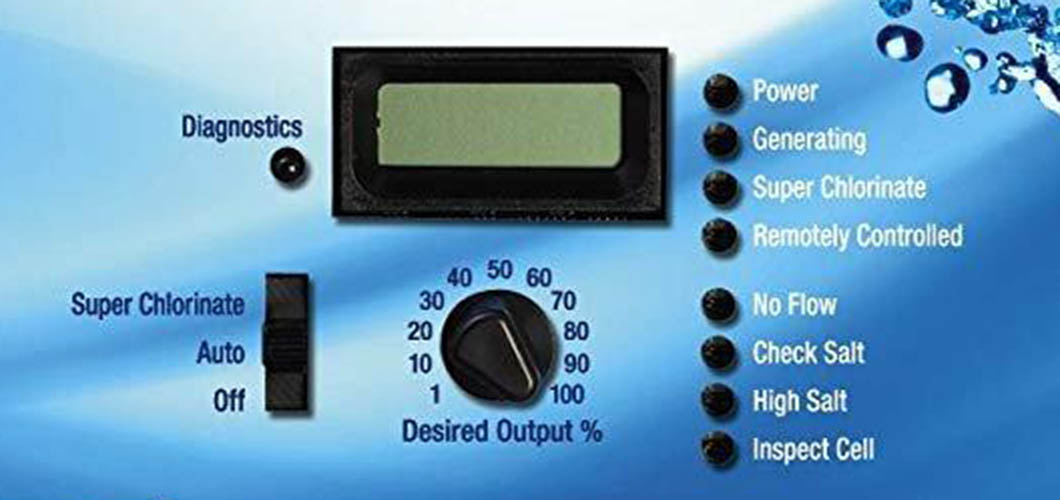
Diagnostic Display Order:
Continuously pressing the diagnostic button on the AquaRite control panel will display the following information. In order of appearance:
- Pool Temperature (xx degrees F or C)
- Cell Voltage (xx.x Volts)
- Cell Current (x.xx amps)
- Desired Output % (“0P”–”100P” depending on knob position)
- Instant Salinity (-xxxx ppm or -x.xx grams/Liter)
- Product Name Sent to the Control Automation Display (AL-0 signifies “AquaRite”)
- Software Revision Level (r1.xx)
- Chlorinator Cell Type (T-3, T-9, T-15)
Recalibrating Your AquaRite Salt System
There are two reasons you might need to recalibrate your Hayward AquaRite salt system. The first is if salinity levels aren't displaying correctly. The second is if you change which cell type you're using with your controller.
How to calibrate salt reading on Hayward AquaRite
To see if your salt system displays accurate salinity levels, use salt water test strips or a salinity tester to measure the actual salt content of your pool. For the most accurate measurement, bring a water sample to your local Leslie's for a free AccuBlue® water analysis. If the salt level displayed on your AquaRite control doesn't match the actual salt levels in your pool, you may need to calibrate your system. Here's how.
- First, make sure your salt cell is clean. A dirty cell can give a false salinity reading.
- While the pump is running, slide the main switch from "Auto" to "Off," and then switch back to "Auto." Wait until you hear the relay click, which will take approximately 5–10 seconds.
- When you hear the click, press the diagnostics button 5 times to display instant salinity. This will begin the calibration process.
- The number on the display will start high, and begin to go down. When the number on the display matches the actual salt level in your pool, slide the main switch up to "Super Chlorinate," then back down to "Auto."
- Your Hayward AquaRite is now calibrated!
How to reset the average salt level
No matter if you're just starting up a new salt system, you're reconnecting your salt system after the long winter hiatus is over, you've recently replaced the salt cell, or you've simply made a few important chemistry adjustments, you may find it necessary to reset the average salt level on your unit. Changing out the circuit board will also require a salt level reset. The process is actually very similar to the calibration steps above, but with some slight variations. Here's how to do it.
- Move the switch to "Off" then back to "Auto," and wait 5–10 seconds until you hear the relay click.
- Press the diagnostics button 5 times to display the instant salt level, and wait for the number to stabilize.
- Once salinity is stable, while the negative sign is still present, slide the switch up to "Super Chlorinate" and back to "Auto."
- It will take about 30 seconds for the unit to settle back on the default reading. But it should now reflect the new average salt level.
- You may need to repeat this process one more time to ensure both polarities, side A and side B, read within 500 ppm of each other.
How to change chlorinator salt cell type for Hayward AquaRite
When your salt cell wears out and reduces (or halts) chlorine output, it's time to replace the salt cell in your AquaRite system. If you're curious about changing the cell type from what you have currently, you must first verify the new cell you install is compatible with your control box. T-Cell-15 cells are compatible with all versions or revision levels of AquaRite. However, the T-Cell-3, T-Cell-5, and T-Cell-9 are only compatible with software revision level 1.5 or above. To check which level you have, refer to the diagnostic display order above — the software revision level is number 7 on the list, so press the diagnostic button 7 times.
If you decide to change your cell type, you'll also need to change the cell type displayed in the control box. Pairing a new salt cell with the incorrect "cell type" setting will disrupt cell function. You'll get inaccurate salt level readings, and the cell won't produce any chlorine. In order for the cell to work correctly, you'll need to recalibrate your Hayward AquaRite for the correct cell type/size. Follow the steps below to calibrate and reset your AquaRite Salt System.
- To change the cell type, first flip the mode switch to "Auto."
- Press the diagnostic button 8 times to get to the cell type menu.
- Flip the switch back and forth between "Super Chlorinate" and "Auto" until you see the correct T-Cell number displayed, and return the switch back to "Auto."
- Your Hayward AquaRite control unit is now calibrated for use with your new salt cell!
Which Hayward salt cell type should you buy?
Before you choose your new cell, make sure you pick one that can accommodate your pool size. A salt cell that's undersized either won't produce enough chlorine, or it will wear out quickly due to overwork. It's always better to purchase a salt cell too large than to purchase one too small.
- T-Cell-15 is for pools up to 40,000 gallons.
- T-Cell-9 is for pools up to 25,000 gallons.
- T-Cell-5 is for pools up to 20,000 gallons.
- T-Cell-3 is for pools up to 15,000 gallons.
Troubleshooting Your AquaRite Salt System
Every piece of pool equipment needs occasional tune-ups and adjustments. Troubleshooting your Hayward AquaRite salt system might sound daunting, but it is a very straightforward process. If you're experiencing any problems with your system, refer to the list below for help in resolving the issue.
1. "Power" light not on
If the Power LED does not illuminate, make sure the voltage is correct. The screw terminals at the control require either 120VAC or 240VAC input power. Verify the voltage with a voltmeter. If there is input power, but the Power LED still isn't lighting up, it may have blown a fuse.
2. "Generating" light flashing
A flashing "Generating" light indicates the pool water temperature may be too high or too low. Extreme water temperature will prevent chlorine production. You can override this by sliding the main switch to the "Super Chlorinate" position. This will allow the salt cell to produce at its maximum output for the remainder of the scheduled run time. However, be advised that inefficient operating conditions can shorten the lifespan of your salt cell. See the next item for further instructions on troubleshooting.
3. LCD displaying "HOT" or "COLD"
Your Hayward AquaRite salt system can only function at optimal water temperatures. If the water temp is below 51ºF or above 139ºF, the salt cell won't work. The first step is to change the water temperature so you can restore proper cell function. On the other hand, if water temperatures are within the accepted range, you may just need to clean the salt cell. If you have a heater or chiller, and the cell is downstream from it, you may need to move the cell or bypass the heater/chiller around the cell to get it working properly again.
4. "No Flow" light on or flashing
The "No Flow" LED light indicates the salt cell has stopped generating chlorine due to lack of water flow. Start by making sure the pump is on and the valve settings are correct to allow ample flow to the unit (wait 60 seconds to see if the error light goes away). Check that the flow switch is properly connected to the control box and is not cut or damaged. Make sure the flow switch has at least 12" of straight pipe before reaching the switch, and if not, consider moving the switch. There should not be an elbow after the switch, either.
Another thing to check is that the flow switch is in the correct orientation (arrows pointing with the direction of water flow), as this can cause the error LED to appear. You can also try removing the plug connector to ensure it's free of damage. Sometimes a blockage in the suction line can cause low flow rates, so remember to clean out your pump strainer and skimmer baskets often, and also clean the pool filter as needed. Worst case scenario, you may have an issue with a faulty flow switch or circuit board, which will need to be replaced.
NOTE: Ensure there is a minimum 12” of straight pipe before the flow switch. If the system still doesn't detect flow, check the arrows on the flow switch to ensure they are pointing in the correct direction.
5. "Check Salt" and "Inspect Cell" lights are both on or flashing
Test the water for an accurate salt reading, and add more salt according to your owner's manual recommendation of 2,700–3,400 ppm (parts per million). 3,200 ppm salinity is ideal for Hayward AquaRite salt systems. When salt levels are within range, check to see if the cell is clean. If it is, the next thing to check is to see if the cell model matches the display reading. If not, calibrate the cell type to the correct setting (see above). Otherwise, you may need to reset the average salt level of the cell (also above) to make sure the readings are within 500 ppm of each other. And if that doesn't work, it may be time to replace the cell. Contact Hayward support for more information.
6. "Check Salt" light on or flashing
Again, test the water for an accurate salt reading, and add more salt according to your owner's manual recommendation of 2,700–3,400 ppm (parts per million), or the ideal of 3,200 ppm for Hayward AquaRite salt systems.
7. "High Salt" light on
Test the salt levels in your pool, and make sure the salinity level is under 3,400 ppm. If it's too high, the only way to lower the salt level is by partially draining and refilling the pool. We strongly recommend checking with your local pool professionals before attempting to dilute the salt water in your pool, and we don't suggest draining more than 6–12 inches of water at a time before refilling. This will help avoid damaging your pool surfaces or the pool structure itself. Other things to check include making sure your unit is programmed to the correct cell type, checking to see if the cell is clean, and resetting the average salt level so both readings are within 500 ppm of one another.
8. "Inspect Cell" light on or flashing
Remove and inspect the salt cell for signs of scaling. If the cell is dirty, follow the cleaning procedures outlined in our Salt Cell FAQ post. Replace the cell if the light is still lit after cleaning. This LED will also flash when the 500 operational hour timer has expired. To manually reset the light, you can press and hold the diagnostics button until the LED turns off (about 3–5 seconds).
9. All four red and yellow lights on
This indicates a possible circuit board fault or electrical issue. Call the Hayward service department at (908) 355-7995 for assistance.
Don't be frustrated by a problem or malfunction with your Hayward AquaRite salt system. Remember, your pool should be salty, not you! If a problem arises, follow this step-by-step guide to get your AquaRite back in the game. And if you have any questions, stop by your local Leslie's to speak to one of our pool professionals.
JUMP IN WITH US ON SOCIAL!